Sponsored By
ROCK
HARDWARE
Tyrolean Traverse

Contributed to Chockstone by Phil Box.
(Neither Phil, nor Chockstone takes any
responsibility for the accuracy of this article, or it's suitability for
the purpose. Use at your own risk.
Chockstone Photography | Landscape Photography Australia | Australian Landscape Photography
Please read the full disclaimer).
Okay we're going to talk about a simple Tyrolean traverse in terms of what it means to a climber and using the gear that a climber would ordinarily have at hand assuming that said climber
has the basics of self rescue gear.
For clarity's sake lets call me the narrator and then we have climber A and climber B. We will be starting from this side, East, and going over to the other side of the chasm to the west and then back across the void to this side, East again.
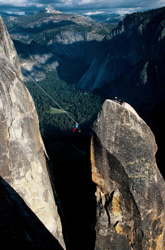
Right: Tyrolean Traverse from Lost Arrow Spire.
Photo by Marten Blumen.
You want to climb a pillar that you don't want to abseil and have to then climb that steep scree slope, solution, Tyrolean traverse. You will need to attach a rope to a dirty great anchor before you leave down the scree
slope on the East side. This is best achieved with a no knot or friction
knot; three wraps around a giant tree and then institute a
figure of eight on the bight at the end of the rope and clip the end of the rope to the main line. Voila we now have the strongest knot known to man
i.e. there is no appreciable decline in the rope strength using this knot.
We will have the other end of the rope attached to us at all times now. You may as well rap using this rope seeing as
it's there and all. So be off with you down the slope then, there you go (climber A). Off goes the second (climber B) to join our leader at the bottom. There do you see him on belay,
don't they make a picture? Up the other side he goes (pictured left), whoa, watch him he nearly took a whipper. Dude, the hand goes in the crack, damn face climbing Victorians. Oh yeah, ahem, where were
we? There goes the second to join our leader at the top of the pinnacle (Over on the west side).
Left: Climbers rap into the chasm down the
East side and lead up the other, West side.
So now we've got two climbers on the other side (West) of a chasm with a rope tied to a bomber anchor on this side (East) of the maw. Our leader (climber A) will now tie the rope to another bomber anchor (West side). He can use a traditionally built trad anchor for the time being. Into this anchor he will have two locking biners that the Tyrolean line will be placed using a muenter mule knot. He will now build a
haul system utilizing a z drag. The Tyrolean line will now be tightened.
It's actually better to not tighten the line too much but you need to tighten sufficiently so that you don't have too much slack otherwise you'll end up at the bottom of the chasm due to rope stretch. Tighten too much and you'll place undue pressure on the anchor due to the torque multiplying effect. Remember your angles for effective anchor building, if you go over 120 degrees you will be adding strain on each anchor in multiples of force greater than the force that you are applying at the single point, thus on a Tyrolean traverse you may only weigh say 80 kgs but the force on each anchor may be many multiples of that, we're talking huge numbers here. Therefore if you have zero sag in your line you could conceivably either pull that tree out or break the rope. Give the rope a bit of sag and don't stretch it too tight.
The reason for the z drag and the muenter mule is that you can pull sag out of the rope and then shuffle the loose section of rope through the muenter and repeat as necessary to achieve the desired tightness in the rope. The Muenter mule is a way of
tying off a muenter hitch.
Send the lightest climber back across to the East side first (Climber B). He should be clipped in by his belay loop and a biner and as well he should have
jumars to pull himself up from the apogee of his descent. If I might explain a little more, the first
back across will of course create some sag in the rope due to his weight he will enjoy a glide downwards until he gets to about midway from there it is all
uphill.
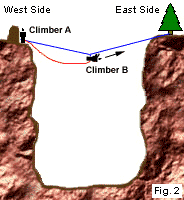
Right: Climber B (the lightest) tyrolean traverses back to the East
Side first.
The first back across can also be belayed down to the midpoint and then make his own way by way of jumars up from midway point. The advantage of another rope on the first
back across will become apparent when we see the necessity to retrieve everything from atop the pinnacle (West).
So now we have one climber on this side (East) and one climber on tuther (insert Yorkshire pommy gardener accent here) side (West). Climber A on other side (West) now has to attach the two ropes together using either an
overhand knot or triple fisherman's
knots. He will do this before releasing any tension from the system. He will release the muenter mule but not release the z drag. He will also have been searching for a convenient bomber natural anchor that he can run the rope around before he joins the two ends together.
Heh heh look at him running around in circles looking for a dirty great tree that
isn't there. He'll just have to settle for slinging the rope around that giant boulder perched precariously (nah
it's bomber) on top of the pile. Okay he's got his anchor sorted so now it's
over to the climber B on this side of the gulch. Hey buddy, enjoy the ride. Down to the bidness bro, guess what, hope you were paying attention over there on the west side cos
you've gotta do exactly the same thing over here dude, that's right tension the other rope you just brought over. Run that rope around that giant tree (on the East side) just like the other one
(also on the East side) and then set up a z drag to pull some tension into the
rope. There ya go just pull it up just like the other one dude, you've done this before why am I even telling you
this? So now on this side (East side) we have two ends of rope running around the tree using
no knots and
figure of eights on the bight clipped to the main lines.

Climber A on other side (West side) can now release his z drag. As climber
A is attaching himself to the traverse he will have two ropes to choose from. He can be attached to one and use the other one as a back up. The best rope to attach himself to is the rope that does not have the joining knot in it as it will be on the other side of the giant boulder. The strand or line with the knot in it will be slightly less strong than that without if you get my drift. Obviously our second traverser (climber A) will repeat exactly the manoeuvres that the first went through to cross the void.
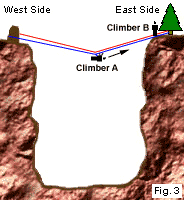
Left: Climber A also tyrolean traverses back to the East
side.
So now we have our two heroes back over on this side (East) and they can now simply retrieve their rope by pulling it from this side as it is simply run around the natural anchor on the other side
(West) of the chasm. Obviously they will pull the strand with the knot on this side of the boulder so that the knot does not have to be pulled all the way around the boulder. Imagine it as just like having to pull a rap rope that has a knot in it through an anchor, you would pull the knot side down and not the free side down as it is obvious that you cannot pull a knot through an anchor can
you?
In Summary
![]()
To make the concept really simple, a rope is dragged across from the East side then a second rope is joined to the first on the West side and the second rope is dragged back across to the East side so that we now have two ropes spanning a void. There will be a knot where the two ropes are joined. This knot will be set up
something like how you would set up a knot for a twin rope abseil. You do not want this knot halfway down the abseil nor do you want this knot halfway across the tyrolean traverse. You will have to do a bit of tensioning of these ropes across the void and to do that you will need anchor knots that are easy to adjust but are absolutely bomber under load and as close to 100 percent rope strength. You will also need to be proficient at z drag hauling to be able to achieve the desired rope tension. You will need to be able to set bomber anchors from which to do your hauling and tensioning.
The thing that really needs stressing is that you will be placing a lot of faith in the anchors you will be using so make sure they are good ones. Another thing that bears mentioning is that when you are at the bottom of the traverse and are ready to come up the other side you will need to prevent yourself from sliding back down the rope as you make your way up. This is very much like a sort of sideways jug so you will be needing 2
prussiks or 2 jumars. Mate it can be hard work particularly if you have a pack to haul.
Don't wear it on your back. Suspend it from the biner attached to the rope. It might even be suggested to wear a
chest harness to keep yourself from inverting as you grow tired.
Do we need to go through all the disclaimers again, ya orta know it all off by heart by now and of course all climbers know that they take responsibility for their own actions. Climbers generally are the sort of people who know how to assess risk and would never do anything to jeopardise their own or their partners safety so obviously if you are going to take any of this advice then you will of course try this all out in a completely risk free and safe environment and test, test, test and then do a bit more research to confirm in your own mind that the system
works.
A word of caution when using a pulley in a tyrloean traverse. You should definitely use two pulleys or a double inline pulley which is meant for aerial cableways. The use of a single pulley has resulted in deaths when a load shift happens and the sheave of the pulley is overloaded and it can be twisted off the axle. Two pulleys or the double inline pulley have the necessary redundancy and resistance to the twisting load. The large knot passing Kootenay pulley from Petzl or similar design pulleys from other manufacturers are fine. If you have no alternative to using a small pulley then do use a screwgate biner backup independent of the pulley.
I'm referring to the
"no knot" as the friction knot. What you do is take the end
of the rope and throw it around a tree three times. The tail of the rope
you place a figure of
eight on the bight and clip that to the main line which
of course is the other tail of the rope that you sent three times round
the tree. Really this is almost too simple a concept and should not be
overcomplicated. We teach the strength and simplicity
of this knot by demonstrating how effective
simply running the rope around a tree and trying to
pull it, it won't undo, the figure of eight on the bight is simply there
to ensure that the wraps won't work their way around
the tree during the load/unload cycles of
rapping.
Further Reading:
Tryrolean
Traverse - Details, gear and diagrams from the Petzl web site.
Mule-Munter
Combination - Scans straight out of Self Rescue. Hmmm, copyright?
Z Drag
Pics - Hauling at 3:1, 5:1, etc. The image is a bit lacking in clarity
though.
Lost
Arrow Spire - Awesome Marten Blumen photo of a Tryrolean off Lost
Arrow Spire.
James Kay Photo
- Wicked photo of a traverse across a huge ice crevasse
Advanced
Ropework - Brief notes on the Tryolean at the bottom of this Time
Outdoors page.
Home | Guide | Gallery | Tech Tips | Articles | Reviews | Dictionary | Forum | Links | About | Search
Chockstone Photography | Landscape Photography Australia | Australian Landscape Photography
Please read the full disclaimer before using any information contained on these pages.
All text, images and video on this site are copyright. Unauthorised use is strictly prohibited.
No claim is made about the suitability of the information on this site, for any purpose, either stated or implied. By reading the information on this site, you accept full responsibility for it's use, and any consequences of that use.
