![]()
Sponsored By
ROCK
HARDWARE
Hauling The Second Past The Crux
This section describes two methods the leader might employ to haul his/her second up past the crux or even up the entire pitch to the belay. This is an advanced topic and I strongly suggest you get someone experienced to show you these methods, in person, so they can verify your technique. I repeat, do not trust what you read here, I make no claim that it's accurate. (See full disclaimer).
Assisted Hoist
"Dude, I'm stuck on the crux!". Halfway up a multi-pitch
climb the cry is heard. You're the leader bringing up a second. What to
do? One solution is to haul his fat ass over the crux moves using an assisted
hoist. This will only work if you have
enough spare slack in the rope being used to belay your second. You'll
need twice the spare rope as the distance down to your second. So for a
long pitch your second will need to be nearing the top. Furthermore, this
may not be a good idea if the route traverses (rope drag) or you can't even see your
second. Never-the-less, once you've determined it's a valid
option, perform these steps:
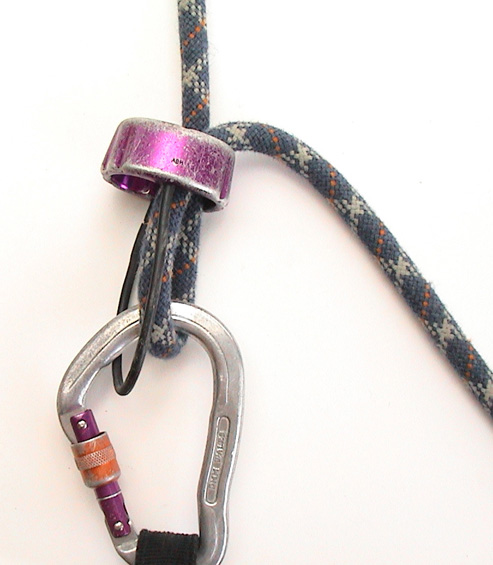
Step 1: Leader is belaying up the second from above. In this
example the belay is off the leader's harness, but the method is the same
for a belay off the anchor. Step 2: Tie off the belay. This is a
topic in and of itself, and I won't go into it here. In this example I've used two
overhand knots, however there are numerous
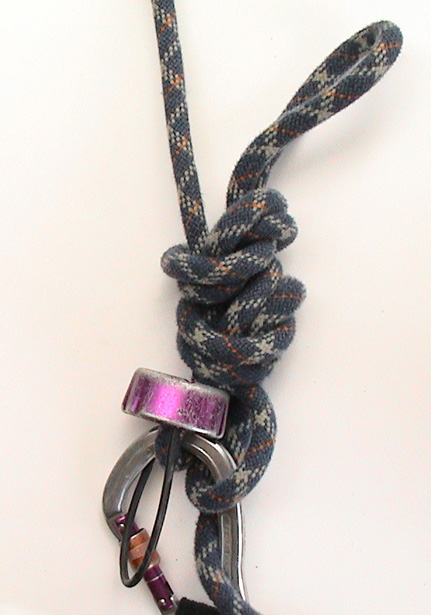
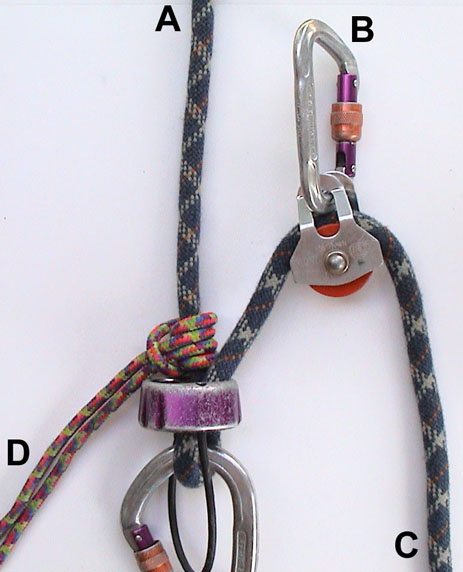
methods. Many use a mule knot with an overhand backup. Pick a method that is quick, simple and safe. Step 3: Attach a prusik,
or autoblock backup (D) to the taut line (A), and clip to your belay anchor. Use a
short loop of cord to make the prusik. The shorter the better, because you
want it snug against the belay device, not slipping down the taut line and
getting in the road. The autoblock knot can be moved when weighted, which
can be handy in this situation, but I've had no trouble with a prusik knot
for this purpose.

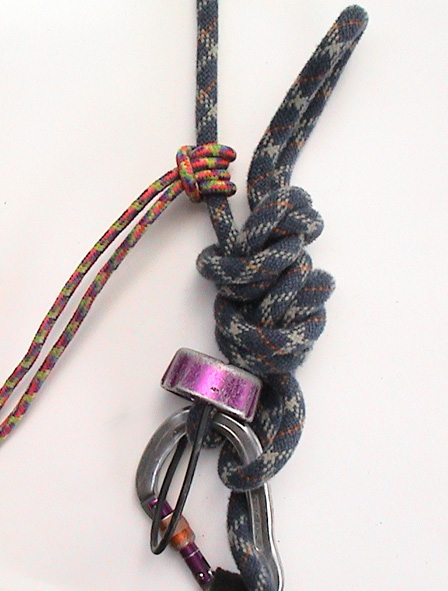
Step 4: Carefully release the tie off, in such a manner that
you still have full control of the belay, and slowly let the prusik take
the weight. Ensure that the prusik is sitting correctly and holding the
full load before proceeding. Step 5: Clip a locking carabiner (B) to a loop of slack rope (pulley
optional), and toss it down to your flailing second. On less than vertical
routes it helps if there's some weight to the carabiner being lowered.
Your second clips the carabiner (B) into
his harness and you both start hauling - him pulling down on the
appropriate line, and you straining upwards on the slack end (C). Mechanical
advantage will ensure he's a light weight to shift. You may have to
loosen the prusik a tad to get underway.
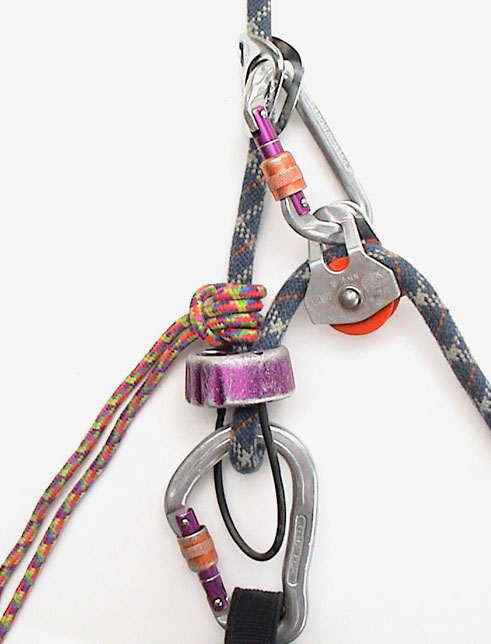
Alternative: If you want to be extra safe, you can change the order a little. After you've tied off the belay, and attached the prusik back up (D) in step 3, lower the carabiner (B) on a loop (from step 5) then tie off the slack end of the rope (C), with a figure-eight-on-a-bite (not pictured) clipped to the belay anchor. This provides a final redundant backup. Then carefully release the tied off belay, adjust for the extra slack you now have, and once you've signalled your second, proceed to start hauling.
Make sure you don't get too enthusiastic hauling, wait for your second to clean any pro on the way up. That might sound unnecessary to mention, but if you can't see your second, or even hear them, it can become an issue. Aided by mechanical advantage you're suddenly possessed with the strength of two men. If you're not careful its possible to tear anchors right out of the rock.
Once your second has been hauled past the crux you can get your hands back into position to recommence normal belaying. Signal to your second to unclip the carabiner (B), and take up the heap of slack. Loosen the prusik a tad, and proceed with normal belaying.
Unassisted Hoist
or Z-Pulley System
When you don't have enough slack rope to do an assisted hoist, you'll
have to use a z-pulley or unassisted hoist. (Important Note: This is really something you should seek professional instruction
for, or at least get a good book on the topic). This gives you a 1:3
mechanical advantage, but it's still quite an undertaking to haul someone
heavy especially if there is any rope drag. Start the same as the assisted hoist, but instead
attach the loop of slack rope to the taut line (with another short prusik, or
something like a Petzl Tibloc as pictured right), pulley optional, then
start hauling on your own. It's a good idea to tied off the slack end of the
rope using a figure-eight-on-a-bite clipped to the belay anchor, just in
case.
It's hard work, and quite uncomfortable if
you're doing this off your harness. You end up having to kick the slack
end down with your foot to gain extra distance (Tibloc works well for
this), because each haul you do only gains you 1/3rd of actual upwards
movement. If you had to haul an injured climber a full rope length, or
even half a rope length, in this manner it would be exhausting work. Make sure you've got all the slack out
of your anchor system beforehand or you could be in danger of hurting your
back.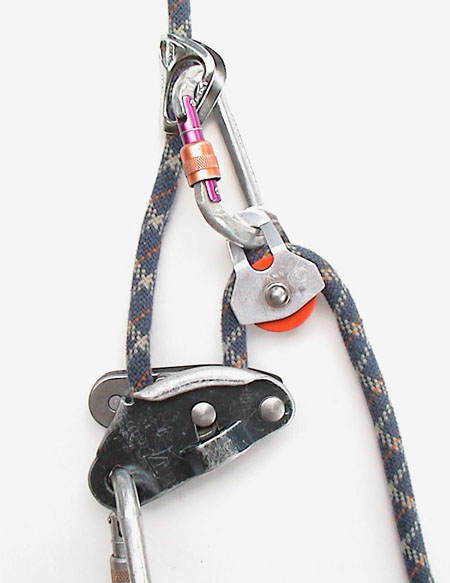
If its really hard work, or painful, you'll need to escape the belay (and possibly re-rig the system to include greater mechanical advantage), and swap the system over so you're hauling off the belay anchor rather than your harness. Escaping the belay should not be difficult since you've already got the backup prusik in place. Just make sure you've tied off the slack end well, as a final redundant backup.
When belaying a second from above (especially one likely to be hanging about) I tend to use a GriGri. This may or may not be recommend by Petzl, but I find both hoisting methods are quicker and easier when belaying with the GriGri, because the device is self locking, you eliminate the need for the prusik backup (pictured right).
Notes On Rasing The Second
Raising your stuck second is, of course, not always the best option
and in many situations not even possible. On a wildly traversing route
rasing them might put them at risk of pendulum falls as they clean your
gear on the way up. Likewise lowering them may also not be an option, for
example, a traversing or overhanging route could mean there is no where to
lower them to. The second should know how to ascend the rope and have
prusiks or similar gear for doing so, though this is may not help at all.
Furthermore if your second is seriously injured or even unconscious a whole mess of issues occur. I'm hardly the person to be advising on such. My experiences have been limited to situations requiring hauling a second too shagged out to pull the crux - nothing more epic than that. Get a good book on self rescue techniques (recommend: Self Rescue - Good book by David J. Fasulo), or attend a course if you wish to know more.
Reader's Feedback
"Mate if you haven't played with the Rescuescender [from Petzl] yet for hauling then
you're way missing out. I tell you that in combination with a GriGri this system would be the easiest and most effective haul system to date.
The Rescuescender with a pulley attached literally glides down the rope making
huge resets for hauling. One can send the Rescuescender pretty much all the
way down as far as you have rope to send it. Can you imagine a Rescuescender
descending from above down to you as the stuck second. What this means is that you could do only one reset to get the second up almost like an
assisted hoist. If you put another pulley at your anchor at the top then you'll
be hauling the rope down towards you instead of pulling up."
- Phil Box.
Further Reading:
Hauling
Systems - From the Petzl web site.
Locking
Off A Belay - From US Mountain Guides web site.
Rescue
Techniques - From the Time Outdoors web site.
Considerations
For Rope Rescue - PDF document by Kenneth N. Laidlaw
Home | Guide | Gallery | Tech Tips | Articles | Reviews | Dictionary | Forum | Links | About | Search
Chockstone Photography | Landscape Photography Australia | Australian Landscape Photography
Please read the full disclaimer before using any information contained on these pages.
All text, images and video on this site are copyright. Unauthorised use is strictly prohibited.
No claim is made about the suitability of the information on this site, for any purpose, either stated or implied. By reading the information on this site, you accept full responsibility for it's use, and any consequences of that use.