Sponsored By
ROCK
HARDWARE
Building A Home Climbing Wall

The "Woodie", or home climbing wall is a project many a climber
has dreamed into existence. Late night sketches on the back of drink
coasters, and avid discussions of angles, holds, size, location, and so
on, has lead to many a half-hearted construction. Usually a serious attempt
is only made when opportunity knocks. In my case this was gaining a friend
who is a builder. He took my hastily compiled sketches, and jumble of
timber and produced the result (pictured right), within a single
afternoon.
My "gym" is actually a cave, being a free
standing cube (approximately 3 metres tall, and wide) with a roof and
an inclined rear wall. The rear wall gets the most use because its steep
gradient provides a tougher workout. The whole thing is just big enough to
enjoy a free flowing bouldering session rather than being reduced to
merely exercising the same moves over and over.

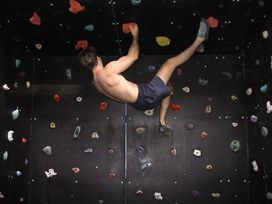
Above Right: Me mucking about on the roof of
the cave. Left: View looking down from outside and above the cave,
note the inclined rear wall recessed into the main vertical posts, which
are concreted into the ground.
The cave is outside, and thus incurs the full sun and rain. To battle this problem we used treated pine for the load bearing structure, galvanised bolts, and those black panels for the walls are the water proof, super strong "marine board" sheets they put behind concrete walls. Whilst they are quite expensive they can take a real beating.
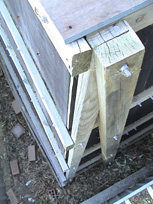
The holds are secured with T-nuts (pictured right)
allowing me to move them at will from inside the cave. After a few seasons
the bolts have become rusted making removal difficult, even though I used
the expensive coated ones. If I was setting it up again, I'd just use
cheap ordinary bolts with washers since access to the outside of the cave is
easy and I don't shift the holds very often.
I picked up the holds at a bargain price from our
local hold manufacturer because they were the "seconds" and
unwanted ones from larger batches. A quick sanding with some emery paper
to remove the excess resin and they're fine. The smallest footholds are
about the size of a 10 cent piece and cost almost as much, then they range
up to the larger roof jugs which I got for about $4 (AUD) each. If you're
in the market for cheap holds, another source is the local climbing gym,
who sometimes replace theirs with newer ones.
On the ground beneath the cave I've laid down wood chips, like they do at children's playgrounds. I've found this sufficient to cushion a fall, and less hassle than dragging an old mattress out every time I want to climb. Which brings me to another point; location. If you're looking to build a home wall, pick a location that is sheltered and easy to access. Believe it or not, but the novelty of having your own wall wears off pretty quick so the more comfortable and inviting you make it, the more likely you'll be to use it.
Size is another major consideration. My cave is just tall enough (over 3 metres on inclined wall), so that a bum start yields about four moves to the roof. Or about a dozen or so moves to traverse the three walls of the cave. If I was setting it up again, I'd make the incline wall steeper, more like 35, even 45 degrees. Or I'd look into an adjustable wall. The less wall surface you have the more of a workout you'll want to pack into that small space. A steep wall provides a pump. I've used a set of small crimps to increase difficulty, but I'd prefer more gradient.
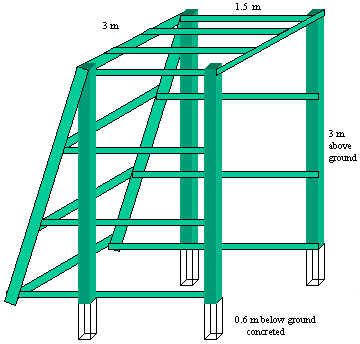
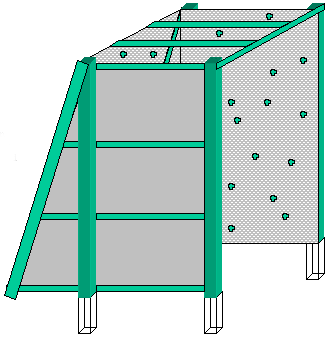
Here's the sketches I drew up originally. We probably didn't stick to the plan completely, but it should give you an idea of the dimensions and timber required.
 |
4 vertical posts - 3.6 m / 100mm x 100mm treated pine. Horizontal slats - 70mm x 35mm treated pine. 2 posts at 15 degrees angle - 3.6 m / 100mm x 50mm treated pine. All components secured in place with galvanised bolts. |
 |
Marine Board Sheets bolted to
slats. Numerous climbing holds bolted to board in a random pattern. Marine Board on roof as well, and covered with corrugated roofing iron to protect from rain. |
| Of course a home climbing wall need not be as elaborate as the one shown above. The simplest ones I've heard described are bolting holds into an existing children's tree house, and one guy who claimed he bolted holds onto a dead tree - not sure how successful that was! A friend of mine has a single sheet of plywood with a metal frame, attached to chains dyna-bolted into an existing brick wall. He can vary the angle of the frame by moving up or down the chain links. The thing flexes a fair bit, but it works. Follow the links below to see more ideas from other web sites. Alternatively there are books available that go into the whole process of planning, construction, route setting and training systems in detail. |
|
Further Reading:
Home
Climbing Walls - Numerous related topics covered on Dawn's FAQ.
Plans
for a single panel climbing wall - at Karl
Lew's Climerware site.
How to Build a Home
Climbing Wall - From Edgewalls
How to Build a
Home Bouldering Wall - From Indoorclimbing.com
Grant &
Phil's Home Climbing Wall - Contributor to Chockstone, Phil
Box, shows us his home wall.
Dead Tree Climbing
- Yep, the dude has bolted holds onto a dead tree in his back yard.
http://www.metoliusclimbing.com/HowtoBuildaHomeBoulderingWall.pdf
http://www.moonclimbing.com/SchoolRoom.aspx?ID=4
http://melhuish.org/climb/homegym.html
Also for design ideas - photos of some woodies, local and abroad. Also
Search for Woodie as there were some other photos posted on the topic
recently...
http://www.woodieworx.com/gallery.html
http://www.flickr.com/search/?q=home+wall&m=text
Commercial Climbing Hold
Manufacturers:
Nicros,
Pusher, Cheapholds.com,
Crux, Entre
Prises, Franklin
Climbing, Juggernaut, Metolius, Stone
Age
Home | Guide | Gallery | Tech Tips | Articles | Reviews | Dictionary | Forum | Links | About | Search
Chockstone Photography | Landscape Photography Australia | Australian Landscape Photography
Please read the full disclaimer before using any information contained on these pages.
All text, images and video on this site are copyright. Unauthorised use is strictly prohibited.
No claim is made about the suitability of the information on this site, for any purpose, either stated or implied. By reading the information on this site, you accept full responsibility for it's use, and any consequences of that use.
